Hey guys! I know I said I was going to continue the Tinkers Construct tutorial but I sort of had some unplanned things that had to be taken care of. Soooo, no tinkering for today. I know, I know it's horrible and I'm sorry but I promise I will get it posted tomorrow without a doubt.
Until Then!
<3LK

Saturday, June 14, 2014
Friday, June 13, 2014
MineCraft: Tinkers Construct Making a Smeltery!
Hey guys welcome back to part 3 of my MineCraft Tinkers Construct walkthrough. As promised today we will be working on building ourselves a smeltery! The smeltery is a multiblock structure that not only smelts your metal ores but also doubles them! I'm going to walk you through how I build my early game smeltery simply because I have found it to be very efficient and easy to expand at a later time without having to take blocks out and put them back in again. In order to get started you are gong to need eighty six each of clay gravel and sand and one piece of glass. Yes I do in fact know exactly how much you need. I wasn't kidding when I said TC is one of my favorite mods!
Once you have all of your materials together we are going to need to make some basic parts. Take one stack of clay gravel and sand and drop all of them into a crafting table side by side. It doesn't matter which order they are in just as long as they all are all in there at the same time. This recipe makes two grout per one sand gravel and clay. Once you craft all of your clay sand and gravel into grout you should have 176 grout. Now drop the grout into a furnace and cook it up in order to make yourself some seared brick. Great now we have the essential building blocks for our smeltery. Let's head over to our crafting station and make the final components for our smeltery.


The first block we are going to make is the smeltery controller. This block is the brain of the smeltery and once everything is put together will act as the primary user interface. In order to make a smeltery controller you need to put seared brick in a square on the crafting grid just like you would if you were making a chest out of wood and there it is. It really is that simple! :)

Now we are going to make ourselves a seared tank. The seared tank is a liquid container that can be used to store fluids such as lava and molten metals, when picked up it will not lose it's contents. This block is going to be used as the fuel intake for the finished smeltery. In order to craft a seared tank you will once again put seared brick in a square but this time you will put one piece of glass in the center.

Now we are going to make three smeltery drains. The smeltery drain is used to siphon the molten metal out of a smeltery using a seared faucet. In order to make one you simply make a line of seared brick on the left and right hand sides of the crafting grid.

Now we need three seared faucets. These will connect to the smeltery drain and when right clicked allow the molten metal in the smeltery to flow out. In order to make one you simply put 3 seared brick into the crafting table in the shape of a v just as if you were making a bowl or bucket.

Next up is the casting table. The casting table has two primary functions. It allows you to make casts out of your stone tool parts and it allows you to use those casts to make make metal tool parts. We will go into this further next time. For now let's just get our smeltery off the ground. In order to make a casting table we are going to put three seared brick across the top of the crafting grid and two down each side, much like you would if you were making a pair of pants.

Now we need 2 casting basins. These will allow us to drain off our molten metal and make easy to store metal blocks. In order to make them you will simply place 3 seared brick across the bottom of the crafting grid and two on each side just as if you were making a cauldron.

Now take the rest of your seared brick and place them in the crafting table in a square of 4. This makes seared bricks and will simply add size and structure to our smeltery. Remember the larger the smeltery the more ore you can smelt at once.

Finally we are ready to build our smeltery! You are going to want to have a good little bit of space since this structure is going to be six blocks across at it's widest point. Once you have a large enough space set up, carve out a 3x3 space in floor wherever you want the center of your smeltery to be. Fill this 3x3 hole with seared bricks. This is your smeltery foundation.

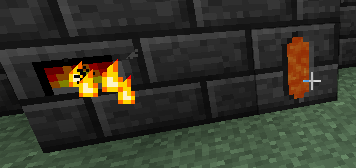
Now put your smeltery controller on the block directly in front of what would be the front left square of your foundation, now place your seared tank directly in front of what would be the front right corner of your foundation, fill in the space between the controller and the tank with seared bricks. now staying directly on the edge of your foundation make the sides of your smelterly. This should take three seared bricks for each side and should look like a square with it's corners cut off when you are finished. If done correctly your smeltery controller should have little flames in it.

Now choose which side you would prefer your main work area to be and place your three smeltery drains across the top level of that side, make sure the holes in the drain are pointing outward. Now put one faucet on each drain hole and then put one casting basin under the left hand faucet and one casting basin under the right hand faucet. Finish off your work area by dropping your casting table between the two basins. The top of the other 3 sides of your smeltery with the rest of your seared bricks. Congrats you have finished your smeltery!

In order to smelt metal you will need to fill the seared tank in the front of your smeltery with lava by right clicking on the tank with a bucket of lava. The seared tank will hold up to four buckets but will work just fine if you only have one.
Now that you have some lave to fuel your smeltery right click the smeltery controller to open up the user interface. On the right hand side you will see an orange bar, this shows you how much fuel your smeltery currently has (if you have just added fuel the interface may not reflect it yet as it takes a bit to update). One the left hand side you will see a bunch of squares. This is where your ore goes. You can put ore in one at a time ore simply hold shift and left click on the ore in your inventory to put in as much as the smeltery has space for. The middle part of your smeltery controller displays what molten metals are currently in your smeltery. It also allows you to switch between which metal is currently active when you have more than one in your smeltery by simply clicking on the metal you wish to use.

That does it for today's tutorial. Drop by tomorrow and we will go into making some basic alloys, casts and some cool new tools using a toolforge!
Until Then!
<3 LK
Once you have all of your materials together we are going to need to make some basic parts. Take one stack of clay gravel and sand and drop all of them into a crafting table side by side. It doesn't matter which order they are in just as long as they all are all in there at the same time. This recipe makes two grout per one sand gravel and clay. Once you craft all of your clay sand and gravel into grout you should have 176 grout. Now drop the grout into a furnace and cook it up in order to make yourself some seared brick. Great now we have the essential building blocks for our smeltery. Let's head over to our crafting station and make the final components for our smeltery.
The first block we are going to make is the smeltery controller. This block is the brain of the smeltery and once everything is put together will act as the primary user interface. In order to make a smeltery controller you need to put seared brick in a square on the crafting grid just like you would if you were making a chest out of wood and there it is. It really is that simple! :)
Now we are going to make ourselves a seared tank. The seared tank is a liquid container that can be used to store fluids such as lava and molten metals, when picked up it will not lose it's contents. This block is going to be used as the fuel intake for the finished smeltery. In order to craft a seared tank you will once again put seared brick in a square but this time you will put one piece of glass in the center.
Now we are going to make three smeltery drains. The smeltery drain is used to siphon the molten metal out of a smeltery using a seared faucet. In order to make one you simply make a line of seared brick on the left and right hand sides of the crafting grid.
Now we need three seared faucets. These will connect to the smeltery drain and when right clicked allow the molten metal in the smeltery to flow out. In order to make one you simply put 3 seared brick into the crafting table in the shape of a v just as if you were making a bowl or bucket.
Next up is the casting table. The casting table has two primary functions. It allows you to make casts out of your stone tool parts and it allows you to use those casts to make make metal tool parts. We will go into this further next time. For now let's just get our smeltery off the ground. In order to make a casting table we are going to put three seared brick across the top of the crafting grid and two down each side, much like you would if you were making a pair of pants.
Now we need 2 casting basins. These will allow us to drain off our molten metal and make easy to store metal blocks. In order to make them you will simply place 3 seared brick across the bottom of the crafting grid and two on each side just as if you were making a cauldron.
Now take the rest of your seared brick and place them in the crafting table in a square of 4. This makes seared bricks and will simply add size and structure to our smeltery. Remember the larger the smeltery the more ore you can smelt at once.
Finally we are ready to build our smeltery! You are going to want to have a good little bit of space since this structure is going to be six blocks across at it's widest point. Once you have a large enough space set up, carve out a 3x3 space in floor wherever you want the center of your smeltery to be. Fill this 3x3 hole with seared bricks. This is your smeltery foundation.
Now put your smeltery controller on the block directly in front of what would be the front left square of your foundation, now place your seared tank directly in front of what would be the front right corner of your foundation, fill in the space between the controller and the tank with seared bricks. now staying directly on the edge of your foundation make the sides of your smelterly. This should take three seared bricks for each side and should look like a square with it's corners cut off when you are finished. If done correctly your smeltery controller should have little flames in it.
Now choose which side you would prefer your main work area to be and place your three smeltery drains across the top level of that side, make sure the holes in the drain are pointing outward. Now put one faucet on each drain hole and then put one casting basin under the left hand faucet and one casting basin under the right hand faucet. Finish off your work area by dropping your casting table between the two basins. The top of the other 3 sides of your smeltery with the rest of your seared bricks. Congrats you have finished your smeltery!
In order to smelt metal you will need to fill the seared tank in the front of your smeltery with lava by right clicking on the tank with a bucket of lava. The seared tank will hold up to four buckets but will work just fine if you only have one.
Now that you have some lave to fuel your smeltery right click the smeltery controller to open up the user interface. On the right hand side you will see an orange bar, this shows you how much fuel your smeltery currently has (if you have just added fuel the interface may not reflect it yet as it takes a bit to update). One the left hand side you will see a bunch of squares. This is where your ore goes. You can put ore in one at a time ore simply hold shift and left click on the ore in your inventory to put in as much as the smeltery has space for. The middle part of your smeltery controller displays what molten metals are currently in your smeltery. It also allows you to switch between which metal is currently active when you have more than one in your smeltery by simply clicking on the metal you wish to use.
That does it for today's tutorial. Drop by tomorrow and we will go into making some basic alloys, casts and some cool new tools using a toolforge!
Until Then!
<3 LK
Thursday, June 12, 2014
MineCraft: Tinkers Construct Basic Tools!
Hey guys, welcome back for part two of my Tinkers Construct how to tutorial! When we left off we had just finished making our basic tinkers workspace and silly me I forgot to tell you one little bitty thing. If you take all of the blocks that you made and put them into your crafting screen you can actually make slab versions of all of those blocks. That's right, teeny versions! These are great for saving space as they can be put into your floor or ceiling dropped right on top of chests (nope they will not interfere with opening the chest) or even slipped into that pesky corner that never seems to have any use. The possibilities are endless! These little guys function just like a slab.
One other thing I forgot to mention because I was so focused on getting our tinkers workspace up and running was the slab furnace which like our other teeny blocks functions just like a slab and costs only six cobblestone to make instead of the normal eight you need to make a furnace. It is made the same way as you would make a normal furnace but you use slabs instead.
Now then let's get down to business! Yesterday I promised we would make us some basic tools and get a better understanding of what each of our tables does. I'm not one to go back on my promises so without further ado grab seven blank patterns and let's head over the the Stencil Table. The stencil table is our first stop to making super awesome unbreakable (sort of) tools. When you open this bad boy up you will see a single square just waiting for something to be put into it. This is where your blank patterns go, drop one in and what do we see? Yes, it's a tool rod pattern! Grab yourself one of those and then click the button on the left hand side that says Next Pattern this will scroll through to the next pattern you can make. The patterns we will need are the tool rod pattern, a shovel head pattern, a pickaxe head pattern, a wide guard pattern, a sword blade pattern, an axe head pattern, and a tool binding pattern. Grab those up using the Next Pattern button to scroll through and head on over to the part builder.

Now that we have our patterns it is time to make the pieces that will combine to become our simple tool set. Open up your Part Builder and drop your tool rod pattern into the top left corner as shown below. Now there are many different materials that can be used to make tools and weapons this way but for now we are going to go with good old stone tools (you cannot make metal tools yet since they require a smeltery). Put some cobblestone to the right of your tool rod pattern and you will see a stone tool rod and a little stone shard pop up. You will also see a lot of text in the black box on the right. Ignore that for now we will go into it much later when we make our more advanced tools. Now the pick up the stone tool rod.

You will notice that you do not have the option of making another stone tool rod. This is because of the stone shard still sitting in your part builder. Stone tool rods only cost 0.5 materials to make and you gave it a whole cobblestone piece. To make up for waste the part builder has returned half of your materials to you in the form of a stone shard.

Grab the shard and the Part Builder will once again let you make tool rods. You can recycle the stone shards by dropping them in the place of the cobblestone. One stone shard will make one tool rod.

Another way to make stone tool rods is to drop two cobblestone into your crafting screen one on top of the other. This way does cost a little bit more material wise but if you are crawling around in a mine and find yourself out of both torches and wood these little guys can be used to make torches! Finally a way for us to use all of that excess cobblestone we end up with while mining!


Ok sorry we're getting a bit off target here hehe. Make yourself four stone tool rods and one of each of your other patterns and head on over to the Tool Station and open it up.

Uh oh, there are a lot of buttons here. Don't worry it is not nearly as complicated as it looks. All of those buttons on the left are simply a list of the different tools you can make. Let's make ourselves a pickaxe. Click the little pickaxe button on the left and this will bring up the crafting interface for the appropriate tool. You will notice several little boxes with shapes similar to the pieces we made earlier at the part builder. Drop these tool parts in the matching boxes and poof you now have a handy dandy pickaxe! Once again there is a bunch of text on the right hand side. Just ignore it I promise we will get into it later.

Now if you choose to you can give your little pick a name before you pick it up. Just click in the text box at the top of the tool station and enter in whatever name you want, pick up your new tool, and congrats you have made your very first tinkers construct tool. The process is the same for the sword shovel and axe, so just repeat and you have your first tool set.

I know I know you are saying LK you made me go through this long drawn out process for crappy stone tools I could have made much quicker with some sticks and cobble?! But you see the thing is these tools don't disappear when they break! You simply drop them into your tool station with some cobblestone and poof all better annnnd it only costs one stone shard (but you can use cobblestone) to fully repair a simple stone tool! Take a tool station with you when you shoot into the mines and the only thing in your way will be inventory space and food!

Time to put these new tools to work, because next time I see you we will be making our very own Smeltery and Tool Forge in preparation for the REAL weapons and tools TC has to offer. Until then get on the hunt for loads of iron, gravel, sand and clay.
Good Luck!
<3 LK
 |
| OMG it's so teeny! |
One other thing I forgot to mention because I was so focused on getting our tinkers workspace up and running was the slab furnace which like our other teeny blocks functions just like a slab and costs only six cobblestone to make instead of the normal eight you need to make a furnace. It is made the same way as you would make a normal furnace but you use slabs instead.
 |
| Ain't it cute?! |
Now that we have our patterns it is time to make the pieces that will combine to become our simple tool set. Open up your Part Builder and drop your tool rod pattern into the top left corner as shown below. Now there are many different materials that can be used to make tools and weapons this way but for now we are going to go with good old stone tools (you cannot make metal tools yet since they require a smeltery). Put some cobblestone to the right of your tool rod pattern and you will see a stone tool rod and a little stone shard pop up. You will also see a lot of text in the black box on the right. Ignore that for now we will go into it much later when we make our more advanced tools. Now the pick up the stone tool rod.
You will notice that you do not have the option of making another stone tool rod. This is because of the stone shard still sitting in your part builder. Stone tool rods only cost 0.5 materials to make and you gave it a whole cobblestone piece. To make up for waste the part builder has returned half of your materials to you in the form of a stone shard.
Grab the shard and the Part Builder will once again let you make tool rods. You can recycle the stone shards by dropping them in the place of the cobblestone. One stone shard will make one tool rod.
Another way to make stone tool rods is to drop two cobblestone into your crafting screen one on top of the other. This way does cost a little bit more material wise but if you are crawling around in a mine and find yourself out of both torches and wood these little guys can be used to make torches! Finally a way for us to use all of that excess cobblestone we end up with while mining!
Ok sorry we're getting a bit off target here hehe. Make yourself four stone tool rods and one of each of your other patterns and head on over to the Tool Station and open it up.
Uh oh, there are a lot of buttons here. Don't worry it is not nearly as complicated as it looks. All of those buttons on the left are simply a list of the different tools you can make. Let's make ourselves a pickaxe. Click the little pickaxe button on the left and this will bring up the crafting interface for the appropriate tool. You will notice several little boxes with shapes similar to the pieces we made earlier at the part builder. Drop these tool parts in the matching boxes and poof you now have a handy dandy pickaxe! Once again there is a bunch of text on the right hand side. Just ignore it I promise we will get into it later.
Now if you choose to you can give your little pick a name before you pick it up. Just click in the text box at the top of the tool station and enter in whatever name you want, pick up your new tool, and congrats you have made your very first tinkers construct tool. The process is the same for the sword shovel and axe, so just repeat and you have your first tool set.
I know I know you are saying LK you made me go through this long drawn out process for crappy stone tools I could have made much quicker with some sticks and cobble?! But you see the thing is these tools don't disappear when they break! You simply drop them into your tool station with some cobblestone and poof all better annnnd it only costs one stone shard (but you can use cobblestone) to fully repair a simple stone tool! Take a tool station with you when you shoot into the mines and the only thing in your way will be inventory space and food!
Time to put these new tools to work, because next time I see you we will be making our very own Smeltery and Tool Forge in preparation for the REAL weapons and tools TC has to offer. Until then get on the hunt for loads of iron, gravel, sand and clay.
Good Luck!
<3 LK
Wednesday, June 11, 2014
MineCraft: Tinkers Construct For Beginners
Hey guys! I've been watching a lot of MC videos with my daughter lately and I have noticed there seems to be a lot of confusion when it comes to playing with Tinkers Construct. Due to lack of knowledge a lot of people completely overlook just how awesome and incredibly useful this mod can be, so I have decided to do a full write up explaining TC and how to use it properly. Hope this helps everyone out!
On the first day in a TC world you are of course going to do your normal vanilla gathering but there is a bit of a twist. At some point later on you are going to need a LOT of sand, gravel, and clay in order to build your smeltery, so once you have your wood and basic stone tools I would advise you set off in search of a place where sand and clay are readily available such as close to a marsh biome the coast or a jungle river. On your journey feel free to slaughter any critters you come across for food and wool so when you find your settlement you can get straight to building your house.
Once you have your first home set up and plenty of wood and stone on hand you will be ready to create the basic tinkers workspace. So make yourself a crafting table if you haven't already and then just drop it in your crafting square in your inventory and make yourself a Crafting station like so.

The crafting station is a basic upgrade to your average vanilla crafting table. When set next to a chest the crafting station will show you the contents of that chest making it easy to pull things out for crafting and then put them back in. This makes for a nice clean clutter free inventory. In addition the crafting station also holds any items you put into it so if you are working on making something and realize you are missing a piece all you have to do is walk away. That's right, no more worries of your stuff dropping all over the ground! When you return to the crafting station your items will be right where you left them making it much easier to finish the recipe you were working on.
The next thing we are going to need to make is a blank pattern. So what we need to do is make ourselves four sticks and four wooden planks. Once you have the sticks and planks open your normal crafting inventory or use a crafting station or bench and put a plank in the upper left hand corner a stick below that and to the right of it then place the final plank next to the bottom stick. You have made a sort of X shape out of the sticks and planks like so.

Blank patterns are the most basic and important blocks in TC. From these will make make our basic tinkers setup and the early forms of every single tool and weapon available in TC. We're gonna need quite a few of these so go ahead and make around a half stack if you have the materials on hand if not try to get at least 10 made so you can finish your tinkers workspace and make a few tools.
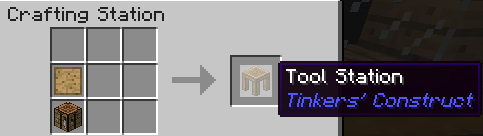
Now that we have our blank patterns made let's go ahead and make the rest of our tinkers workspace. You will need 4 blank patterns one chest one crafting table one wood plank and one log. put your patterns into your crafting station and then place each item in individually. One pattern plus a plank will make you a stencil table. One pattern plus a chest will make you a pattern chest. One pattern plus a crafting table will make you a tool station. One pattern plus a log will make you a part builder.


Now set these down in your home any way you want them but try to be sure your part builder is next to your pattern chest and your crafting station is next to a double chest in order to achieve maximum efficiency.I generally set down a double chest then the crafting station then the stencil table then the pattern chest then the part builder and finally the tool station like so.

Congrats you now have your first tinkers workspace. Join me again tomorrow for a more in depth look at each of these pieces and the building of our first tools and weapons.
Until then!
<3 LK
On the first day in a TC world you are of course going to do your normal vanilla gathering but there is a bit of a twist. At some point later on you are going to need a LOT of sand, gravel, and clay in order to build your smeltery, so once you have your wood and basic stone tools I would advise you set off in search of a place where sand and clay are readily available such as close to a marsh biome the coast or a jungle river. On your journey feel free to slaughter any critters you come across for food and wool so when you find your settlement you can get straight to building your house.
Once you have your first home set up and plenty of wood and stone on hand you will be ready to create the basic tinkers workspace. So make yourself a crafting table if you haven't already and then just drop it in your crafting square in your inventory and make yourself a Crafting station like so.
The crafting station is a basic upgrade to your average vanilla crafting table. When set next to a chest the crafting station will show you the contents of that chest making it easy to pull things out for crafting and then put them back in. This makes for a nice clean clutter free inventory. In addition the crafting station also holds any items you put into it so if you are working on making something and realize you are missing a piece all you have to do is walk away. That's right, no more worries of your stuff dropping all over the ground! When you return to the crafting station your items will be right where you left them making it much easier to finish the recipe you were working on.
 |
| Crafting Station with a double chest. |
The next thing we are going to need to make is a blank pattern. So what we need to do is make ourselves four sticks and four wooden planks. Once you have the sticks and planks open your normal crafting inventory or use a crafting station or bench and put a plank in the upper left hand corner a stick below that and to the right of it then place the final plank next to the bottom stick. You have made a sort of X shape out of the sticks and planks like so.
Blank patterns are the most basic and important blocks in TC. From these will make make our basic tinkers setup and the early forms of every single tool and weapon available in TC. We're gonna need quite a few of these so go ahead and make around a half stack if you have the materials on hand if not try to get at least 10 made so you can finish your tinkers workspace and make a few tools.
Now that we have our blank patterns made let's go ahead and make the rest of our tinkers workspace. You will need 4 blank patterns one chest one crafting table one wood plank and one log. put your patterns into your crafting station and then place each item in individually. One pattern plus a plank will make you a stencil table. One pattern plus a chest will make you a pattern chest. One pattern plus a crafting table will make you a tool station. One pattern plus a log will make you a part builder.
Now set these down in your home any way you want them but try to be sure your part builder is next to your pattern chest and your crafting station is next to a double chest in order to achieve maximum efficiency.I generally set down a double chest then the crafting station then the stencil table then the pattern chest then the part builder and finally the tool station like so.
Congrats you now have your first tinkers workspace. Join me again tomorrow for a more in depth look at each of these pieces and the building of our first tools and weapons.
Until then!
<3 LK
Tuesday, June 10, 2014
MineCraft: Resolving ID Conflicts
Have you ever had an issue where two mods you really want to have installed at the same time gave you the ever frustrating brown screen of oops?
Although it took me a bit of time to figure out how to fix this, being the epic newb of minecraftiness that I am, this issue is surprisingly easy to fix. The first thing you will want to do is open the minecraft launcher just like you are going to play. Then down on the bottom left hand side you will want to click edit profile.
Now you should see a list of of the conflicting items the names of the mods they come from and their corresponding ID numbers. Below that is a list of available ID numbers.
Keep this list up and go back to your MineCraft folder. Now we need to find the folder titled Config and open it up.
Now then in this situation we have a conflict between Dartcraft and Witchery so I need to open the file for one of these two mods in order to change the item ids. In this case we will choose witchery. Scroll down the list of mods until you find the one you need and double click it.
 |
| Yep this one.... |
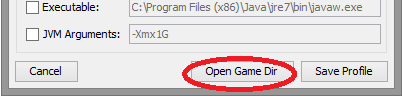
| Dis button! |
This should open up a little white box. Look at the bottom and click the button that says Open Game Dir.
 |
| Open sesame! |
Oh look, it's your Minecraft folder! Now what we are looking for is a text file named IDConflicts. Find that badboy and click away.
| It's so conflicted... |
Now you should see a list of of the conflicting items the names of the mods they come from and their corresponding ID numbers. Below that is a list of available ID numbers.
 |
| Oh snazzy a recommended list of open item ids! |
 |
| That's the one! |
Now then in this situation we have a conflict between Dartcraft and Witchery so I need to open the file for one of these two mods in order to change the item ids. In this case we will choose witchery. Scroll down the list of mods until you find the one you need and double click it.
 |
| Witchery, just what I was looking for. |
Once you have located and opened up the config file for the mod you are working with it is as simple as hitting Ctrl F entering in the item name or number that was conflicting and hitting enter. This should find the item in the list for you. Now just change the item number to one that falls between the suggested ranges provided for you in the id conflicts report. Repeat this for each item on your list of conflicts, save, close everything up and relaunch the game. Your ID conflict should now be resolved. Please note that if you have added several new mods to your game at once you may end up with multiple ID Conflicts before you are able to play. Keep editing ids and resolving the conflicts until the game no longer detects anymore.
Subscribe to:
Comments (Atom)